Sunday, July 31, 2016

Conservation Spotlight: Trash Hero


Today we are chatting with Roman from Trash Hero, an organization that started in Koh Lipe, Thailand, and is now spreading all over Asia.

What does Trash Hero do?

The Trash Hero mission is to create sustainable, community-based projects that remove existing waste and reduce future waste by inspiring long-term behavior change.

We do this through:

Action and Awareness

We pick up trash. Whether a cigarette butt on the road, or 40,000 pounds (20,000 kilos) from island beaches — if we see it, we clean it. And as they say, actions speak louder than words. By spending just a few hours together picking up trash, people can see the real-world consequences of being careless about waste.

Education

We back up hands-on experience with educational information about the impact that trash has on the global environment.

Sustainable Projects

We create long-term projects that bring communities together to remove and better manage their waste, and strategies that reduce the amount of waste being produced in the future.

Inspiration

We motivate people to become Trash Heroes in their everyday lives. Trash Hero Thailand alumni have gone home to make their own heroic clean-ups around the world.

We believe that every one of us can be a Trash Hero. We invite everyone to read more about our projects, and join this global movement today.

How and why did it all start?

We just wanted to clean up one beach and had such a great day we thought many other people would like it. The first clean-up was in December 2013 with 17 people, with a group of locals and westerners from Koh Lipe, Thailand. We started asking for support from the local businesses, and soon enough there were more people. A year later we started Trash Hero Ao Nang, and as of today, there are more than 20 local Trash Hero chapters in five countries, with new requests every week.

How many people are involved and what are their roles?

We’ve got 9,800 volunteers across the globe helping to pick up trash. All of the 20 chapters worldwide have local members that organize cleanups, reusable bottle supplies or school education.

What are the main actions and areas of focus?

We organize trash pick-up and help promote waste management depending on the local systems.

We also offer a reusable bottle program in order to reduce waste. We manufacture the bottles and sell them at cost prices to our partners. They sell them locally and commit to provide free water refills to the people using reusable bottles. The aim is of course to reduce the use of plastic bottles.

Finally, we team up with local communities in order to run local school education programs.

How can people help?

People can show up at any cleanup, start their own Trash Hero chapters or donate money via our website.

whyweshouldntlitter_en


The post Conservation Spotlight: Trash Hero appeared first on Scuba Diver Life.


from Scuba Diver Life http://ift.tt/2a9dyHt

Saturday, July 30, 2016

Social Work Self-Care: The Art of Outside Meditation

Most people are not awake at 5 a.m. But this is the chosen time and this is when I awaken to take care of myself. For a very long time, I have had a meditation practice.

from The New Social Worker Online — the professional social work careers magazine http://ift.tt/2aliUR4

THE POWER OF CLIENT SELFIES: HOW TO GET YOUR SALON SELFIE-FRIENDLY

The power of a selfie. There is no better testimonial than a client’s endorsement in an image. If posted to social media outlets a client selfie can expose your salon to tons of potential new clients. Instead of wishing for this kind of exposure, add it to your marketing strategy and make it happen!

Get Selfie-Friendly
It's no secret that guests love to photograph themselves after a salon visit (when they are looking and feeling their best). More often than not, after a hair appointment clients take selfies in their car or once they get home and proceed to publish it to their favorite social media. They might talk about their new hairstyle, but they don’t always mention the salon or the stylist.

When done properly, you can make the name of your salon appear on their picture, almost like an automatic watermark! To do this simply add a decal sticker of your salon business name or hashtag on a frequently visited mirror or at each salon station mirror right in their field of view. This encourages selfies taken IN THE SALON.

Create a Selfie Station
Go a step further and add a Selfie Station in your salon. What is a Selfie Station you ask? It is an area in your salon specifically designated for clients to take selfies of their fabulous new do’s. 

A selfie station can be as simple as a clean backdrop to take a picture and post it to their favorite social medium. A beautiful colored wall with your salon name and logo is ideal, or display a gorgeous mirror for client selfies. Label with a sign above the created space with “Take a Selfie”. 

Selfie Promotion
A “selfie promotion” offers a discount, a sample service, or retail product as a gift if they tag your salon and stylist. Invite clients to tag the salon and stylist, once posted (while in salon) they get the credit.

Before and After
Encourage guests to take pictures of themselves, both before and after their service. Dramatic style changes (long hair to short pixie) or color transformations (ombre and balayage) get the highest rates of views and clicks. Your salon team should also be encouraged to take before and after images of their favorite hair makeovers to post on the salon social media outlets.

Repost Endorsements
Make sure you re-post all endorsements on your salon social media channels to spread the word. Don't forget "before and afters" get the highest rates of views and clicks. 

Create a Salon Hashtag
Take it a step further, create a salon hashtag! Assuming your salon has an Instagram account (if you don't have one, get one NOW). Make the decal a hashtag that your salon is known by, in most cases it will be the name of your salon, part of it, or perhaps something else all together like #oribeobsessed. Making the decal a hashtag will automatically encourage “selfie takers” to hashtag YOU.

Hashtag for Maximum Exposure
Here is an example of an excellent way to “tag” your next client selfie for maximum exposure. Another fabulous #haircut by Melrose #BluebirdSalon. We are absolutely loving this new pixie short hair trend. #springtrend #shorthairdontcare #thechop #nj #bergencounty #englewoodnj #hair #shorthair #shorthairstyle #longtoshort #hairsalon

Take advantage of the "selfie trend" - its a fun part of our culture that translates to a purely organic form of salon advertising that should be added to your marketing strategy for 2016.
 

In salon advertisingsalon client selfies strategysalon promotionssocial media marketingsocial media for salonssocial media ideassocial media marketing for salonssalon hashtags Tags salon selfie promotionsselfie-friendly


from Beauty Business Blog http://ift.tt/2aF52kA

Becoming a PADI Course Director Part I: The Application

When it comes to professional dive training, only Course Directors can teach scuba instructors and IDC staff instructors, and certify specialty instructors. Unlike the rest of the PADI professional certifications, wherein you must meet criteria to apply and/or pass an examination, the PADI Course Director process is a selective one.

Having been a divemaster for the last 10 years and a full-time instructor since 2013, I recently became a PADI Course Director. As I grew as an instructor, I became more interested in teaching higher certification levels, such the divemaster course. The next logical move was to become an IDC Staff Instructor, which I did in 2014. Working on Instructor Development Courses at Blue Corner Dive and helping our candidates prepare for the instructor examination was both enthralling and challenging.

Applying for the CDTC

All this knowledge and experience helped me grow as a dive instructor, and soon enough, my next step was to become a Course Director. This isn’t necessarily a decision all dive pros would make; I know a lot of exceptional dive professionals who have no intention of seeking further training. It requires a lot of time and effort just to apply to the Course Director program, and although the training is not cheap, it’s a great investment for those wishing to teach instructors or to spend more time out of the water but still work in the industry.

There are two PADI Course Director Training Courses (CDTC) each year; one is held in Malaysia in March, and the second one is held in the Dominican Republic in June. Both admit a limited number of students (around 40), but anyone matching the required criteria can submit an application.

When I decided to apply for the CDTC, I had a pretty incomplete idea of exactly what was involved in the application process. Candidates must, of course, have completed a minimum number of dives, certifications, and other specifics that they would have needed to get the Master Instructor rating. Many other factors are taken into account in order to “rank” your application among the others, such as your involvement with conservation and Project AWARE, the number of dive professionals you have trained, the number of IDC courses you have staffed, and so on. A very important part of this process is your plan: where you’ll work as a Course Director and what strategies you’ll implement to be successful. While creating a plan with my manager, I also received help from the PADI Regional Manager for Indonesia, Paul Tanner, and from Colin Melrose at PADI Asia Pacific.

The final part of the application process is an interview with a PADI staff member, during which you’ll discuss motivations, the plan as described above, and any other topic that’s relevant.

Once candidate interviews are completed, all applications worldwide are put together and the selection committee reviews them in order to decide which ones will be approved for the training. As for my own application, I already knew there was stiff competition for the course in Malaysia. I also knew I really wanted to be chosen, and finally…an email arrived to tell me I was in! In our next installment, I’ll share tidbits and tips on the training itself.

The post Becoming a PADI Course Director Part I: The Application appeared first on Scuba Diver Life.


from Scuba Diver Life http://ift.tt/2apk0G8

Friday, July 29, 2016

Store profile: Hunt Country Jewelers.

I recently had the pleasure of visiting Hunt Country Jewelers:  a second-generation family owned gem of a jewelry store in picturesque Purcellville, VA, and I can’t wait to tell you all about it.

First things first: the setting. Purcellville is a beautiful little town in the heart of Virginia wine country. Rolling hills, wide skies, friendly residents, wine everywhere. It’s worth visiting on its own.

The beautiful, gallery-like space of the family owned Hunt Country Jewelers in picturesque Purcellville, Virginia.Hunt Country Jewelers is right in the middle of the town, across from a distillery. It’s a bright, open, thoughtfully-designed space that feels like a gallery without the standoffishness. Warm wooden display cases, bright lit, dot the room, holding everything from large, custom show pieces to sterling silver earrings to loose gemstones awaiting their fates.

I met Logan and Carolyn of Hunt Country Jewelers at a GIA event some months ago. After chatting with Carolyn for a few minutes, I complimented her glasses frames: they were gold colored, with pretty little details. She responded, “Oh, thanks! My husband made them,” and then proceeded to tell me how she was tired of needing to have bent glasses frames repaired, so her husband simply made her a pair out of actual gold so that he could fix them himself at his jewelers’ bench whenever necessary.

If that doesn’t make you want to meet these people, you’re reading the wrong blog.

This incredible tanzanite ring by Hunt Country Jewelers features an intricate setting with tiny, golden animals. Look at those elephants!

The ring above features a tanzanite that Logan and Carolyn brought back from their honeymoon (didn’t you visit gem mines on your honeymoon?) in a custom-made setting that shows a tiny wildlife scene: here in the foreground you can see a rose gold mama elephant with her baby, in front of the spreading branches of a stand of trees that hold the central tanzanite.

Every step of the process – from selecting and cutting the tanzanite to designing, creating, and perfecting the setting – was conceived and executed by a member of the Hunt Country Jewelers family. And when I say “family,” I do mean family: husband and wife Ed and Claire Cutshall were the ones who founded the business, and now their son Logan, and his lovely wife Carolyn are involved as well.

That’s three lapidaries and two Gemologists: Ed even holds the patent to a gemstone cut, the Jubilant Crown, and his designs have taken home awards in both the International Pearl Competition and the AGTA Spectrum Awards.

A glorious tourmaline cabochon ring made by Hunt Country Jewelers.

In other words: small shop, little town, staggering amounts of knowledge and talent.

Logan, following in his father’s gemological footsteps, has even been dabbling in gem importing through his connections at certain African mines. He says he enjoys seeing all the rough that comes through and – even better – he gets first pick of the stones.

It only takes one look around the showroom to see that Hunt Country Jewelers is run by people who love gemstones: bright green garnets, vibrant tourmalines, and rich tanzanites stand out among more frequently seen stones like aquas, diamonds, sapphires, and amethyst.

Side view of an incredible tanzanite ring in gold. Handmade by Hunt Country Jewelers.

Hunt Country Jewelers’ signature style is light and airy, often featuring swirling designs reminiscent of Celtic knots but more freeform. It’s beautiful and distinctive, providing a perfect foil for stones like the perfect tanzanite in the setting above.

A beautiful garnet ring with a matching necklace, both made by Hunt Country Jewelers.

The Hunt Country Jewelers’ showroom is dominated by one-of-a-kind pieces, but the store is starting to expand into some limited edition lines of designs reproduced a few different ways, or with a few different stones: I saw this lovely, leafy necklace with a few different stones – and as a pair of matching earrings! The garnet was my favorite.

This cool custom project by Hunt Country Jewelers is three rings with articulated gold bands that fasten in the back like a watch.

With so many jewelry experts in one place, innovation is inevitable. Here’s one experiment that I was able to see for myself: these rings have articulated shanks that fasten in the back like a watch. They’re completely handmade, and extremely cool.

The idea was to create a ring that arthritis suffers could put on without needing to slide it over swollen knuckles. (Logan told me that he was happy with the design, but that he hopes to make it even better.)

The beautiful dragon and fairy opal pendant, handmade in yellow gold by Hunt Country Jewelers.

Here’s a very special custom piece. This one is Papa Ed’s work, the senior Mr. Cutshall. He was inspired by the ethereal fire of this opal to craft it a setting that featured a tiny fairy and a tiny dragon gazing at each other across the stones. The whole design flows with an organic energy that makes it feel like it’s a scene you’re seeing in a dream, rather than something that somebody made.

Three beautiful garnet rings made by Hunt Country Jewelers.

In conclusion: I urge you to go to Purcellville, VA, drink some local wine, and visit Hunt Country Jewelers. Ask Carolyn for a restaurant recommendation – she knows her stuff. You won’t be sorry.

See more from Hunt Country Jewelers on their website, and check out their Instagram to see the brand new designs are they are always creating.

This post is brought to you by Hunt Country Jewelers. 

The post Store profile: Hunt Country Jewelers. appeared first on Diamonds in the Library.


from Diamonds in the Library http://ift.tt/2aCl9Pl

Diving Fundamentals: The Dive Briefing

As experienced recreational divers, it’s all too easy to become blasé about dive briefings. However, during those five to 10 minutes, the instructor will share all the crucial aspects of the dive with you to make the experience both safer and more enjoyable. It’s essential, therefore, to be on time for the briefing and to pay attention. Here are some tips to get the most out of each dive briefing.

Be on time

Make a note of when the dive briefing begins and be there on time. This may seem like common courtesy, but there’s more to it than that. Most dive boats plan multiple dives each day, all depending on particular arrival/departure and travel times between sites. Tides, water conditions and the movements of other dive boats have been calculated to give you, and all the other divers on the boat, the best dive trip possible. If you’re 10 or 15 minutes late for a briefing, it doesn’t just hold up that dive; it may have a domino effect on the rest of the day for everybody onboard. Need to prepare your camera? Adjust your weight belt? Analyze your nitrox? Do it before the briefing.

Take notes

It’s often worthwhile to take a slate and pencil to a dive briefing in order to scribble down any key pieces of information that will be useful during the dive. Draw an outline of the shape of the site and note the direction you’ll be heading, or jot down any key instructions, i.e. to keep the reef on your right shoulder. Having notes about the site along with you will reduce any stress and make for a more relaxing dive. Don’t forget to write the dive site’s name for your log book later.

Pay attention to the entry requirements

When and how you enter the water can vary dramatically from site to site. At some sites, you may simply giant stride from the main vessel into the water. A stronger current at other sites may mean you must descend as quickly as possible. At some sites you may be required to do a negative entry and immediately leave the surface. Using the correct entry, as advised in the briefing, could make the difference between having a great dive or drifting right past the site and, embarrassingly, being picked up by the Zodiac.

Make note of the dive plan

Much like entering the water, the basic layout and style of the dive may vary. Is it a boat dive where you’ll need to turn at an agreed upon point — either gas or time limit — and head back to the main boat? Or is it a drift dive, wherein you’ll launch an SMB and a dinghy will pick you up at the end of the dive? Are you with a guide who will send you up for your safety stop in buddy pairs as you run low on gas, or are you returning as a whole group? Is there a 60-minute time limit? A depth limit? Make note of all these things, as they’ll be explained during the dive briefing.

Be aware of hazards

Some dive sites feature specific hazards; perhaps there are strong currents or you should watch for a particular type of flora or fauna.  Perhaps there are swim-throughs or small caverns where you’ll be required to pass through one at a time. This pertinent information will be shared at the briefing.

Listen for points of interest

The men and women conducting the briefings dive these waters every day, so if there’s a specific type of wildlife you’re hunting for or if some aquatic life is specific to the site, they’ll know the best place to look for it. So whether you’re a critter-hunter looking for a seahorse, a wreck-head looking for the guns on a warship, or in search of the cleaning station and large pelagic life, the instructors and guides can tell you where to spend your time and gas.

Know what equipment you need

If there are any gear recommendations specific to the dive site or trip, the instructor or guide will often explain them during the briefing. Perhaps there will be a hang-tank under the boat. You may be advised to take a torch on the dive in order to pick out certain types of well-camouflaged aquatic life or to negotiate swim-throughs. You may need to deploy your SMB. All these useful pieces of information will be explained during the briefing.

Brush up on your hand signals

Most recreational divers know the common hand signals: ok, up, down, safety stop, I have a problem, etc. However, there may be site-specific signals you’ll need to know. For example, the instructor may use a signal specific to a type of wildlife that’s difficult to spot so that you know what you’re looking for, such as a pygmy seahorse or ghost pipefish. Or, they may use specific signs to tell you to launch your SMB, turn, beware of a current, to point out a swim-through or the key features of wreck.

How will you end the dive and exit the water?

Depending whether you’re returning to the main boat, the main boat is picking you up, or the dinghy is collecting you, there may be a specific procedure for ending the dive, either in terms of where to surface or how to board the dinghy. The briefing will reveal all. Also, should you require nitrox or a specific gas mix for the next dive, you should let the crew know at the end of the current dive so they have the surface interval to blend the tanks. You’ll be made aware of the procedures in the briefing.

And if it all goes wrong?

Thanks to modern training and technology, today’s diving is thankfully very safe. However, in a briefing you’ll be informed what to do in the event of an emergency; everything from recall procedures to where they keep the first aid kit and oxygen.

Although there are universally applicable bits to many dive briefings, listening and picking out those specific pieces of information about your dive can help you and your buddy have a happier, safer, stress-free and more enjoyable experience. So pay close attention during your next briefing: you never know what you may learn.

By guest author Marcus Knight (The Scuba Monkey)

The post Diving Fundamentals: The Dive Briefing appeared first on Scuba Diver Life.


from Scuba Diver Life http://ift.tt/2ahy9dV

How to re-engage the mobile-first generation


from World News Publishing Focus by WAN-IFRA - World Association of Newspapers and News Publishers http://ift.tt/2ahYtyq

Thursday, July 28, 2016

Real World Clinical Blog: An Enactment With Rice

I met Jane, the therapist of my life, in 1995. I was a sophomore in college. The vernacular around having a love of our life is well established. But we don’t talk as much about the therapist of our life.

from The New Social Worker Online — the professional social work careers magazine http://ift.tt/2ahayDZ

South African Journalists' Jobs in Limbo over Broadcaster Protest Ban


from World News Publishing Focus by WAN-IFRA - World Association of Newspapers and News Publishers http://ift.tt/2aAy1ma

Ceasefire Brings Hope to Colombian Journalists


from World News Publishing Focus by WAN-IFRA - World Association of Newspapers and News Publishers http://ift.tt/2aAy6Xa

Be a Good Dive Buddy to Your Child (Without Hovering Too Close)

Parents with newly certified children will most likely go through all the same anxiety that they went through themselves as new divers. Even now, with our son’s logbook boasting 79 dives over the last three years, I still spend more time watching him on a dive than I do the reef, my gauges, my husband or anything else. After all, we spend much of our time trying to keep our kids safe, and now they’re engaged in a sport that is considered more “high-risk” by life insurance companies than driving a car. Here are some tips to help you be a good dive buddy to your child — without tethering them to you on a retractable leash.


No. 1: Begin with the basics.

New divers, or those who have not been diving in a while, need bottom time, and parents need time to form their own assessment of their child’s diving ability.  Spend time in a quarry, shallow lake, or shore diving where there’s a gentle slope. Doing some dives where your child did his or her open-water certification can be a great way to make you both more comfortable in the water, and should allow you the opportunity to assess their ability while practicing or refreshing skills.

No. 2: Repeat and remind.

Just like with anything else, it is important to cover the rules of diving again and again with your children. Talk about the rules of the buddy system — keeping close to each other, getting your buddy’s attention before going off to look at something, checking on each other’s air, etc.  You should do this at least before every dive trip, if not before every dive. Children are eager and excited to jump in the water when they get to a dive site, so the continual reminders will increase their awareness about safety.

No. 3: Plan the dive and add a challenge.

It can be unnerving to let your kids explore because, in my experience, they will think of it like running in all directions on a playground. Children can be easily distracted and “wander” off on a dive, so plan to head in a certain direction, and make it an out-and-back dive if possible. Engage them in a game of show and tell, where you alternate picking out something to show each other. This will keep them focused on you to see what you’ve found, and will require them to stay close to get your attention when they want to show you something.

No. 4: When diving on a wall or on a deeper site, talk about additional hazards.

Keep in mind that your child may not be as attuned to significant depth changes on a wall, especially in very clear water, so you need to talk about staying cognizant of it before you begin the dive. Explain that they can go a lot deeper (or shallower) than they intend to very quickly, and that they must monitor their gauges more than they typically do. You can also ask them more often how much air they have to keep them looking at their gauges.

No. 5:  Sometimes it’s okay to hover.

Finally, even though you want to give them their space, if the diving conditions are such that you are nervous for them, trust your parental instincts. It is completely acceptable for you to “let them lead” on the dive while you gently hold onto a tank valve or a ring on the edge of their BC.  Odds are that they will not even realize that you’re holding onto them. If you think they may be uncomfortable on a dive, remind them that they’re welcome to hold onto your BC or you can even just hold hands.

Adding your child to a dive may never result in the comfort level you feel while diving with a spouse, sibling, or friend, but it’s exhilarating to watch them discover the underwater world. Diving repeatedly and frequently with your child, as well as continually reviewing safety and good diving habits, will help to make both of you the best buddies you can be.

By guest author Christine Brinkley

The post Be a Good Dive Buddy to Your Child (Without Hovering Too Close) appeared first on Scuba Diver Life.


from Scuba Diver Life http://ift.tt/2agZ0DT

Self-Care as a Vital Tool in Maintaining an Objective Perspective and a Healthy Life/Work Balance for Social Workers

The next time you find yourself struggling to indulge in emotional well-being sustaining self-care, remember to give yourself permission to reach for that oxygen mask. It really is okay and necessary.

from The New Social Worker Online — the professional social work careers magazine http://ift.tt/2a6l69y

Wednesday, July 27, 2016

Instagram highlights of my NYC trip.

Hello, darlings!

I’ve returned from my jewelry safari in the Big Apple, and oh my goodness do I have pretty things to show you – if you follow me on Instagram, you’ve already seen some of them. It was quite an adventure, from Forevermark to Verdura and Belperron, fine antiques at Doyle and Doyle and Fred Leighton to the cutting edge of contemporary at JANY and JCK’s Luxury Prive.

I’m going to get to work going through all my photos and picking out the best ones to share with you, but I wanted to give you something fun to look at while I’m photo processing.

Click to view slideshow.

Here’s a little slideshow of my top Instagram posts from my NYC trip!

This is just a teaser: please stand by for many more pretties from the city.

xoxo,
Becky

PS: Don’t miss your chance to enter my giveaway! You could win a rose gold and diamond ring by Jennie Kwon.

The post Instagram highlights of my NYC trip. appeared first on Diamonds in the Library.


from Diamonds in the Library http://ift.tt/2aq7TuO

South African Great Whites on the Verge of Extinction

Six years ago, I was lucky enough to see South Africa’s majestic great whites while cage-diving off the coast of Gansbaai, the small town at the heart of the country’s lucrative shark-diving industry. The visibility was poor and the water was freezing, but nothing could dampen the thrill of watching those torpedo-shaped sharks materializing out of the gloom just a few feet from the cage bars.

Now, a study led by Stellenbosch University researcher Sara Andreotti reports that these iconic predators may be facing extinction in South African waters. Published in the journal Marine Ecology Progress Series, the results of Andreotti’s six-year project show that the South African great-white population has declined to between 353 and 522 individuals. To reach this conclusion, Andreotti and her research partner Mike Rutzen spent two years studying sharks in the Gansbaai area, and another four years following individuals in a sailboat along the east coast.

The team identified individual sharks by using mark-recapture techniques to organize nearly 5,000 dorsal fin photos into a comprehensive database. Each dorsal fin has unique markings that allow scientists to distinguish one shark from the next, so Andreotti was able to determine a population estimate with 95 percent confidence. Unfortunately, the results showed a 52 percent decline when compared with previous mark-recapture studies. This led Andreotti to conclude that “the numbers in South Africa are extremely low. If the situation stays the same, South Africa’s great white sharks are heading for possible extinction.”

Great White Shark

Andreotti corroborated the results of the mark-recapture study with genetic data gleaned from biopsy samples. She thinks a number of factors are behind the species’ rapid decline, including the shark nets and baited hooks used to protect bathers and surfers along South Africa’s eastern seaboard. Between 1978 and 2008, these culling mechanisms were responsible for the death of 1,063 great white sharks, while shark nets in KwaZulu-Natal killed an average of 20 white sharks per year between 2010 and 2014. A reduced death toll in recent years is further proof of the sharks’ decline.

Poaching for trophies like shark jaws is another issue, the study says, despite the fact that in 1991, South Africa became the first country to make great-white shark fishing illegal. More insidious factors are also exacerbating the problem, including overfishing. In 2011, the World Wildlife Fund declared 50 percent of South Africa’s marine resources fully exploited. As fish stocks continue to dwindle, it is possible that there are fewer Cape fur seals, which make up the sharks’ diet. A key reason for the decline of South African great whites in particular, however, is their limited genetic diversity.

Results from the analysis of Andreotti’s biopsy samples show that South African great whites have the lowest genetic diversity of any white shark population, with just 333 individuals contributing to their overall gene pool. Diversity is key, as it increases the likelihood that individuals can adapt in the face of disease or environmental changes. This could also explain why populations elsewhere remain relatively healthy. According to Andreotti, “previous research on other species indicates that a minimum of 500 breeding individuals is required to prevent [the problems caused by] inbreeding.”

If this proves true for great whites, Andreotti believes that “their numbers might already be too low to ensure their survival.” As key apex predators, great whites are essential to South Africa’s marine ecosystem. If they disappear, the ecological ramifications would be disastrous. Andreotti believes that urgent management measures are the South African population’s only hope — and the only hope that future generations have of experiencing their magic as I did.

The post South African Great Whites on the Verge of Extinction appeared first on Scuba Diver Life.


from Scuba Diver Life http://ift.tt/2aK7ces

Tuesday, July 26, 2016

CME Delivers: A Multi-Million Dollar Hospital Project Completion Story

Opening a new hospital requires years of planning.  Everything from what equipment to purchase, to how the work flows, to computer integration, are all challenges that need to be considered.  The list goes on and on. This list has gotten more complicated since the ACA (Affordable Care Act) was enacted.  Not only do you have to select the right product technically, you have to take into account how this equipment will impact patient satisfaction, patient outcomes, and the bottom line.


from CME Insiders http://ift.tt/29Xjgfs

Lembeh: A Photographer’s Dream

With world-class muck diving and a chance to see more critters than you can count, Lembeh Strait between northern Sulawesi and the island of Lembeh in Indonesia is at the top of many bucket lists. Here, carefully searching the brown sand pays off with sightings of octopus, frogfish, cuttlefish and everything in between. underwater photographers can find everything from octopus to frogfish. Dive sites rarely exceed 20 meters, so you’ll have plenty of bottom time to search out all the weird and wacky Lembeh residents — happy hunting!

Lembeh Strait Lembeh Strait Lembeh Strait Lembeh Strait

All photos taken by Scuba Diver Life with the SeaLife Cameras Micro 2.0.


The post Lembeh: A Photographer’s Dream appeared first on Scuba Diver Life.


from Scuba Diver Life http://ift.tt/2au6pSD

Court Rules in Favor of Marine Mammals in U.S. Navy Sonar Debate

In 2012, the National Marine Fisheries Service (NMFS) granted permission for the Navy to use low-frequency active sonar as part of its peacetime training and testing activities. The approval was valid for a period of five years, and applied to exercises in the Indian, Pacific and Atlantic Oceans as well as the Mediterranean Sea. In the same year, environmental groups led by the Natural Resources Defense Council (NRDC) filed a counter-suit, claiming that the approval put vulnerable cetacean and pinniped species at risk and did not fulfil the terms of the Marine Mammal Protection Act.

Whales_on_beach,_Farewell_Split,_South_Island,_New_Zealand

On July 15th, California’s Ninth U.S. Circuit Court of Appeals ruled in favor of the environmentalists. The Marine Mammal Protection Act states that peacetime oceanic programs must have “the least practicable adverse impact on marine mammals,” a stipulation that the court unanimously agreed the approval had failed to uphold. The court did not place the blame on the U.S. Navy, however, which it stated “has been deliberate and thoughtful in its plans to follow NMFS guidelines and limit unnecessary harassment and harm to marine mammals.” Instead, the court pointed the finger at NMFS.

The terms of the original approval required the Navy to shut down or delay sonar use when a marine mammal was detected near the ships, and also banned sonar pulses near coastlines and in protected waters. However, the court ruled that the areas classified as “protected” by the NMFS were inadequate, in reality doing very little to shield vulnerable marine mammals from sonar-generated sound waves capable of reaching 235 decibels. To put that into perspective, the sound of a 12-gauge shotgun being fired is 165 decibels, while the average rock concert reaches just 115 decibels.

Underwater, sonar sound waves can travel for hundreds of miles. They are found in approximately 70 percent of the world’s oceans, and can measure up to 140 decibels at a distance of 300 miles from their original source. Scientists believe that this noise pollution causes severe stress for marine mammals by interfering with their echolocation and communication systems, and forcing them to alter their feeding and mating behavior. According to NRDC’s Marine Mammal Protection Project Director Michael Jasny, “marine mammal species perceive these [sonar] sounds as a threat and react accordingly.”

Navy sonar exercises have been linked to several mass strandings, including the 2002 stranding of 14 whales in the Canary Islands. Autopsies showed that the whales had gas bubbles in their tissues, leading some to hypothesize that sonar may cause decompression sickness in cetaceans. At this point, it is not clear what the court’s ruling means for the future of U.S. Navy low-frequency active sonar. The case has been returned to the district court for further consideration, but it is hoped that scientists will eventually find a way for marine-mammal conservation and national defense to co-exist.

The post Court Rules in Favor of Marine Mammals in U.S. Navy Sonar Debate appeared first on Scuba Diver Life.


from Scuba Diver Life http://ift.tt/2atOcSd

Monday, July 25, 2016

Job-Seeking Strategies for the Nontraditional Social Work Student

So here you are, an older/nontraditional student who has majored in social work and who isn’t quite sure which path to follow with your degree. Unlike a lot of other careers, social work offers many choices. Life experience can be an asset.

from The New Social Worker Online — the professional social work careers magazine http://ift.tt/2amt0Ou

3 Tips for Installing Curtains

Putting up a curtain can be an easy way to upgrade any window in your home. In this article we will cover 3 guide tips for installing curtains, including: planning out your installation, installing rod brackets and hanging your curtains.

Image Source: Flickr

Image Source: Flickr

Planning Out Your Installation
Before you buy your curtains, snap a photo of your windows. Measure the width at the top, center and bottom of the window frame. Make a sketch marking the largest measurement. Also mark nearby vents, light switches and electrical outlets so that you don’t cover them.
Curtains: The size of your curtains makes a difference in the room’s decor:

  • 63-inch curtains usually sit at or just below the sill.
  • 84-inch curtains sit at or just above the floor.
  • 95-inch curtains can be pooled on the floor for a more dramatic appearance.

You may need longer curtains if you’re mounting the rod near the ceiling. For width, both curtains combined should be at least twice the width of the window and trim.
Rods: Along with curtain size, the rod size and placement can make a difference too. Rods that extend 2-3 inches beyond the frame give a traditional look allowing the curtains to partially cover the window when open. Extending the rod 10-15 inches beyond the trim reveals the entire window, making it look wider. Source: Lowes

Installing Rod Brackets
Determine Bracket Placement: We decided to place our curtain rod 1-1/2” outside of the window on each side.  This placement will ensure there will be no gap between the curtain and the window.
Also, determine the vertical placement of the brackets.  This will likely depend on length of your curtains. Hanging the brackets above the window can make the window appear larger than it is.
Place Bracket Screw Holes: Place the bracket on the right side over the center of the mark.  Using a level and a pencil, mark the holes where the screws will go.
Drill and Secure Brackets: Pre-drill holes for the screws using a 1/8” bit. Insert the screws into the pre-drilled holes, stopping about 1/4” away from the surface of the window frame. Slide the bracket onto the screws. Tighten the screws to secure the bracket to the window frame.
Level and Secure Other Bracket: Place the rod into the right-side bracket and use a level to determine the placement of the left side bracket.  Align the bracket over the center of the 1-1/2” mark you made earlier. Use a pencil to mark the holes where the screws will go.  Remove the rod, and repeat steps 4 to secure the left-side bracket to the frame. Source: DIYNetwork

Hanging Your Curtains
Thread the rod through the curtains. Attach your curtains to the rod before hanging the rod from its brackets. This will make things easier for you. Clip the straight tops of tab-less and pocket-less curtains with curtain clips. Start at the outer edge of each panel and space each clip evenly.

  • Thread the rod through the top pocket opening of the rod pocket curtain panels. Pull each tab loop of both curtains over the rod.
  • Secure the rod to the brackets. For most bracket and rods systems, you’ll either thread each end of the rod through the bracket holes or place the rod on top of a crescent-shaped depression in the brackets.
  • Finalize the installation. Press the two finials into each end of the rod, or screw them in place, depending on their construction. Once the curtains are hanging from the rods in the desired spot, test the curtains. Make sure you can move the curtains as they’re designed to move. Source: wikiHow


Contact:
Universal Blinds
601 – 1550 W. 10th Ave
Vancouver, V6J 1Z9
Canada
Phone: (604) 559-1988

The post 3 Tips for Installing Curtains appeared first on Universal Blinds, Shades & Shutters.


from Universal Blinds, Shades & Shutters http://ift.tt/2aqmxoN

Turning Pollution into Art: Washed Ashore

Along with climate change, over-fishing and habitat destruction, plastic pollution is one of the greatest threats to ocean health. Oregon-based non-profit Washed Ashore is shining a spotlight on the situation by collecting debris from America’s beaches and using it to create artworks designed to raise awareness about man-made pollution.

The sculptures of monumental sea creatures are stitched together under the guidance of artistic and executive director Angela Haseltine Pozzi from carefully collected and collated pieces of trash. Ranging from great white sharks to octopus and triggerfish, the sculptures are both colorful and incredibly lifelike, drawing the attention of passersby, encouraging them to find out more about the project and the origin of the materials. By showcasing the sculptures in a series of traveling exhibitions, the charity hopes to thrust plastic pollution into the public spotlight.

Washed Ashore Washed Ashore Washed Ashore Washed Ashore

Stemming the Tide

Changing the way that people think about plastic pollution is key when it comes to finding a solution, as approximately 80 percent of marine debris comes from land-based sources. Human beings release the equivalent of one garbage truck full of trash into the ocean every single minute, according to a report released by the World Economic Forum and the Ellen McArthur Foundation. Equating to 8.8 million tons of plastic per year, statistics like these have led researchers to predict that there will be more plastic in the ocean than fish by 2050.

Plastics now pollute every marine habitat, from the shallowest estuaries to the deepest ocean trenches. They take hundreds of years to degrade, if at all. During this time, items may claim the lives of countless sea creatures as a result of entanglement or ingestion. When plastics finally do degrade, they release toxic chemicals. Primary organisms absorb these, causing contamination throughout the food chain. By offering educational workshops alongside their exhibitions, Washed Ashore hopes to increase awareness of these often unseen effects.

Washed Ashore Washed Ashore Washed Ashore Washed Ashore

Volunteer Cleanups

There is more to Washed Ashore than beautiful artworks and high-visibility publicity, however. Much of the charity’s work happens behind the scenes, with volunteer beach clean-ups that not only provide artistic material, but also help remove significant amounts of trash from the marine environment. Since the organization launched in 2010, more than 10,000 volunteers have helped process 38,000 pounds of marine debris. Washed Ashore used 95 percent of this debris in the sculptures, creating more than 60 so far.

Of the 300 million pounds of plastic produced globally every year, less than 10 percent is recycled. Washed Ashore hopes to change that statistic, by encouraging consumers to take a closer look at their own plastic-related behavior. Current exhibits include a 17-sculpture installation at the Smithsonian National Zoo, and a 13-sculpture installation at Georgia Aquarium.

For more information on how to become a Washed Ashore volunteer, click here.

The post Turning Pollution into Art: Washed Ashore appeared first on Scuba Diver Life.


from Scuba Diver Life http://ift.tt/2a5Qs5z

Sunday, July 24, 2016

Back-to-School Merchandising Ideas for Beauty Businesses

063c3e9f580ba1f0587197d8aab44c4b.jpg
61ae37fc24c826bc085b1c39a3b05c28.gif
1a37421eae213a23c9c627049cb7a07f.jpg
5ac208c9da893a38d7ffea756bba93f3.jpg
il_570xN.978604758_pych.jpg
38d2ae16ae6ee7bf630e882ff40109b0.jpg
1274076c73dd0b8f13f70086d55d12b7.jpg
d12cac3439fb33089c3304891c09b498.jpg
Screenshot 2016-07-22 12.40.28.png
a839b74b45b1c8b5f430759f977091dc.jpg
Screenshot 2016-07-22 10.42.25.png
48ddfda0af858690e7d30a1f9e8e70b9.jpg
d84714fa50b2727bf9c80535f850676a.jpg
d0ccfa837a3b56074a8ad6aefcaa9dc6.jpg
05060d3e8eff24327ba7cef5eaf5e9be.jpg

August and September for most US households are back-to-school months and pose as a second “new year” of the annual calendar. This is a period of transition from the lazy days of summer to jam-packed days of routine. Many schools resume in mid-to-late August, making the first week of August the perfect time to implement a back-to-school theme update.

Determine a back-to-school "look" for your beauty business and express it by choosing props and retail products that tell a story in your special branded way. This type of merchandising requires a little planning and a few special details to add personality to salon displays. The objective is to create a salon experience that guests will not find anywhere else. 

No1 Pick a theme.
Back-to-school themes are plentiful. Anything school-related grouped by color such as hardback books, chalkboards, world globes, alphabet cards, or natural references such as apples, or fall leaves are all traditional back-to-school symbols.

No2 Merchandising tells a story.
Theme everything to a back-to-school "story" – color choices, merchandising support elements, point of purchase signs, and retail offerings work together to visually support the theme. A unique shopping ambiance sells more retail and adds to the bottom line.
* To get more ideas check out our Back-to-School Merchandising Pinterest Board.

No3 Back-to-School themed window displays.
Salon windows are your most valuable advertising space. A Back-to-School theme should be prominently showcased in the window. Don’t underestimate the power of talking to the street. Pick a theme, be bold.

No4 Add new back-to-school-themed products to your salon retail.
Adding a new line of products to your salon retail could open up whole new lines of business for your salon. Expand inventory by bringing in hair treatment products, fragrance, cosmetic organizers, pretty notebooks and pens or "dorm-inspiring" items (good gifts or POP). 

No5 Retail props.
Mix retail with merchandising support elements - these are the little details such as lunch boxes, chalkboards, vintage school books and typewriters - elements that make your displays special. Create small vignette displays that are grouped by color or theme, the purpose of merchandising is to show-off your "wares".

No6 Add zest with fresh flowers.
Fresh flowers mixed into displays add instant zest for such a little cost. The simple use of fresh apples and sunflowers in pretty vases add instant summertime to any retail display. 

No7 Shelf talkers. 
Tell your story clearly with themed point of sale signs or shelf talkers mixed into retail displays. Clearly state prices, product highlights, seasonal packages, or specials you wish to highlight. Signage should both inform and encourage purchase. 

No8 Back-to-School themed selfie station.
Add a bit of back-to-school fun to encourage salon tagging, and/or use it internally for salon before and after shots to share on social media. What is a Selfie Station you ask? It's a cool staged place or space in your salon specifically designated for clients to take selfies. 

Add a Back-to-School themed selfie station in your salon to play up the season. Large apples, hanging streams of paper leaves, vintage books and typewriters, a chalkboard backdrop (with your salon logo in chalk).

This August and September implement a Back-to-school merchandising theme to add retail and service dollars that count.


from Beauty Business Blog http://ift.tt/2alIYcO

The Best Dive Sites in Bonaire

It happened during one of those perfect diving moments: it was a bright, clear day on Bonaire. Visibility extended to 80-plus (24 m) feet. The sun penetrated into the shallow water, dappling the coral with splashes of light. Schools of brilliantly colored grunts, blue tangs and black durgons (triggerfish) swirled around me. Here, on a section of the reef called Rappel, the French angelfish and queen parrotfish were abundant. I felt like I had somehow been transported to the world of a Disney cartoon. That’s when it struck me. Bonaire was a kind of time machine, offering divers a chance to experience what Caribbean reefs were like 50 years ago. The best dive sites in Bonaire still offer visitors that feeling.

Bonaire’s reefs aren’t pristine by accident. When few were thinking of underwater conversation in the 1960s, Captain Don Stewart decided this reef was something special, so he and others lobbied for a ban on spear fishing. In the years that followed, others worked to have the entire reef set aside as a national marine park. By 1979, Bonaire passed a law to protect the reef. Visiting divers are now required to get a $25 tag, good for one year of admission, from the national park agency. This you’ll to affix upon their BCD showing that they’ve paid park dues. Bonaire’s reefs are in such good shape, in fact, that the National Oceanic and Atmospheric Administration (NOAA) uses them as the benchmark for healthy reefs in the Caribbean.

Diving here is some of the easiest you’ll ever do — the entire island is geared toward getting you into the water. Rental pickup trucks have tank racks (and some resorts feature drive-through tank delivery). Yellow-painted roadside stones show the location of each dive site: simply park the truck, gear up, and walk in. Given how easy it is to dive here, it’s considerably harder to narrow down the best dive sites in Bonaire. Below we share our favorites. If we’ve left yours out, let us know and we’ll be sure to dive it the next time we’re on the island.

North of Kralendijk

Oil Slick Leap

The fun on this dive starts with the entry. For the moderately brave, there’s a chance to giant stride off a cliff that drops about 10 feet right into the water. It’s perfectly safe — the water underneath is 20 feet deep. The faint of heart can use a ladder, which you’ll also use to exit. The reef here could have been created by the master of fairy tales, Hans Christian Andersen. Coral castles appear periodically along the reef as you head south — stacks of sheet and pillar coral that have swelled to heights of 30-plus feet, looking vaguely like they’ve been built by gnomes from tree stumps and toadstools. Flitting in among the gnome castles, thousands of tiny, colorful reef fish complete the fairyland illusion.

Rappel

One of the northern sites not reachable via shore, Rappel is worth a visit by boat. A shallow plateau (20 to 30 feet) extends out from a rugged cliff on shore, and great light penetration means great color. I’ve never seen a lot of large sea life at this site, but take your time to swim around and look for the impressive macro life for which Bonaire is known. By moving slowly across the reef or even hanging in one spot, I’ve spotted frogfish, seahorses and filefish. Keep an eye out for pretty little juvenile spotted drums, swimming around outside their lairs.

1,000 Steps

Despite the name, it’s not 1,000 steps down to this dive site, (although it will feel like that many on the way up). It’s only 64 and quite manageable even if you’re only in moderately good shape. The site itself is absolutely worth the work of hauling your gear down to the beach. Once you determine which way the current is running, swim into it until you’ve got to turn. Look for large brain coral, a number of massive grouper and lots of sizable rainbow parrotfish.

the best dive sites in bonaire the best dive sites in bonaire the best dive sites in bonaire the best dive sites in bonaire the best dive sites in bonaire

South of Kralendijk

Angel City

This one’s a Bonaire classic, and a great place to experience the double reef that distinguishes the coast south of Kralendijk, the island capital. There’s an inshore reef in about 30 feet (10 m) of water, followed by a separation of about 40 to 60 feet (12 to 18 m) of sand and then a second reef in deeper water at about 60 feet. On a typical dive, you’ll descend on the outer reef for the outbound leg and then hook around and follow the inner reef for the return. Keep an eye on the sandy stretches for stingrays and the occasional eagle ray.

Hilma Hooker

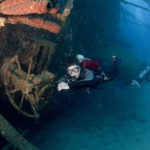
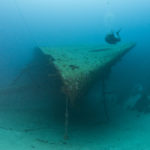
The drug-smuggling vessel Hilma Hooker famously went down after being detained at the Town Pier in 1984. A large freighter, it eventually sank in relatively deep water as it was being towed to an anchorage. At 90 feet, it’s more of an intermediate dive. You can reach it by boat or from shore, but visiting via shore means a bit of a swim out to the wreck. If you access the site via shore, you’ll swim along a gradual slope of coral before plunging down a wall to finally get to the wreck. Some nice coral along the way makes the trip interesting. There’s something grand about the Hilma Hooker, and good visibility will allow you to see the entire length of the wreck, which seems to stretch out forever at 236 feet (72 m) long. A quick peek into the cargo holds may reveal schools of tarpon.

The Salt Pier

Salt Pier is one of the island’s most popular sites, and it’s easy to see why. There’s an easy shore entry; it’s not too deep, between 15 and 50 feet, (4.5 to 15 m); and there’s tons of sea life hiding among and swimming through the pylons that support the pier. Take your time and look for the plentiful macro life that lives among the coral and sponges that encrust the pylons. If you’re not a macro hunter, never fear — the pier seems to attract a lot of large fish, too, including barracuda and tarpon, and a seemingly ever-present school of grunts swirling around the area. Salt Pier is perfect for photographers who want to incorporate the pylons, and there’s some very cool scenery on the shore as well, piles of white salt surrounded by pink salt flats. 

the best dive sites in bonaire the best dive sites in bonaire the best dive sites in bonaire the best dive sites in bonaire the best dive sites in bonaire

Klein Bonaire

Although almost all of Bonaire’s dives are accessible via shore, the tiny, uninhabited island of Klein Bonaire sits about a mile off the west coast and is worth a visit by boat.

Sampler

On an island of fairytale dive sites, Sampler is perhaps the most surreal. Diving here is reminiscent of a misty morning in the Arizona desert: tube sponges replace cactus; soft coral replaces tumbleweed; coral heads replace the granite hillsides of the desert. True to its name, Sampler offers a bit of everything — seahorses, sea turtles, delicate golden spotted eels. Expect to spend your whole dive surrounded by a swirling mass of black durgon.

The Forest

Visit the forest for what amounts to a 2-for-1. The boat will drop you off at this wall and then you’ll do a comfortable drift dive to the site immediately west, Southwest Corner. Both these sites are adjacent to the open water and that means lots of large barracuda and turtles. Morays and reef fish are plentiful as well. Watch the current as you get close to Southwest Corner, as it picks up speed.

The East Side

Most of Bonaire’s dive sites are on the western (or leeward) side of the island, but the so-called “wild” east side has a few worthy sites of its own. For many years, operators ignored the east side entirely, as a constant wind blowing in from the southeast creates significant waves and swells. All that changed when Larry Baillie bought a solid-hulled Zodiac that could handle any waves the east side could create. Frankly, you feel a bit like a Navy Seal heading out in Larry’s boat. During our first dive on Larry’s Reef, we saw eight large turtles and half dozen large stingrays.

White Hole

This, the east side’s most famous dive site, amounts to large underwater amphitheater.  Expect lots of tarpon to be swimming about. If you hang in the water and let the swell carry you, you’ll get within a few feet of these medieval-looking fish. On our last dive here, we passed a section of the reef where an enormous school of blue chromis surged in and out of the coral. It looked as if someone had kicked an anthill as the small fish boiled around the reef in the tens of thousands. At the end of the day, the east side may require a little more effort than the rest of the island, but it’s well worth it.

One small note —  the Town Pier is now off limits to divers. This is a shame, as it has been consistently rated as one of the best night dives in the Caribbean — think “Blade Runner” meets “Finding Nemo.” It’s a world that features an ongoing struggle between the cast-offs of a working dock and the unceasing activity of a coral reef. Tires and broken bits of machinery compete with delicate sponges and golden corals. Frogfish inhabit lofty perches on the pylons; seahorses hang from old bits of metal and rubber; and spotted and moray eels have taken up residence in broken bits of concrete blocks. If the site ever opens up again, it’s a must do.

The post The Best Dive Sites in Bonaire appeared first on Scuba Diver Life.


from Scuba Diver Life http://ift.tt/2aDSnds

Self-Care Summer: Coloring for Social Workers

The recent trend toward coloring books for adults inspired the creation of these coloring sheets for social workers, from Nate Crowell, blogger at SocialWorkerSuccess.com.

from The New Social Worker Online — the professional social work careers magazine http://ift.tt/2a50u0Y

Saturday, July 23, 2016

The Hunt for the Roanoke: Part II

Although it went down in 1864, the remains of the Roanoke are still undiscovered off the shores of Bermuda — but not for lack of trying. Fast forward to 2013 and we ship-seekers have made a number of surface scans in the area where we believe the ship’s remains may be resting. We’d received a number of favorable hits on our scanner, indicating what appeared to be large, metal objects in various locations on the bottom. We carefully plot them for our subsequent dive trips to hunt for the Roanoke.

Hunting for the Roanoke

Our intrepid group of divers leaves the mooring on a stunning December day, and heads down the island’s south shore to the first site. We anchor, honing in on the most promising plotted points first. When we begin our first dive we find — literally under the boat — a huge ship’s anchor and chain, which appears to our untrained eyes to be at least 100 years old. Immediate dreams of hitting the jackpot on the first try surge through all of us as we follow the anchor chain over the reef to…nothing at all. We begin our search patterns and each group is coming across anchor after anchor, which vary from hundreds of years old to massive anchors from the middle of the last century.

In four dives, we discover more than 16 anchors. It’s a graveyard of the most incredible variety anyone has ever seen. We even discover two anchors on top of each other. For some added excitement, we also find huge artillery shells, obviously from the land-based forts. In the past, these strongholds had trained their guns on areas of the channel in case of invasion.

the hunt for the roanoke the hunt for the roanoke the hunt for the roanoke

Where did the anchors come from? 

The main question on all our minds’ was how all those anchors got there, and why there were so many in such a relatively small area. When in doubt, one should consult the best. So we took our photographic evidence to the famous wreck hunter, Teddy Tucker (now, sadly, deceased). Tucker was almost certainly the most knowledgeable man in the world when it came to Bermuda shipwrecks. Tucker explained that we’d found so many anchors because it was the main area for ships to await a favorable wind to enter St George’s harbor. Clearly, many ships had their anchors fouled and had to cut them away. The anchors we found did indeed date from the 1600s up to World War II.

The hunt continues

As for the Roanoke itself? We found no trace — no burnt wooden remains, no boiler, no wreckage of any kind. Naturally, we asked Teddy if he thought we were searching in the right area. My lasting memory is of him looking at me with a typical twinkle in his eye. “Do what I did,” he said. “You guys just keep on looking.” We will Teddy, we will. The search continues this year. Who wants to join us?

By guest author Mark Diel

The post The Hunt for the Roanoke: Part II appeared first on Scuba Diver Life.


from Scuba Diver Life http://ift.tt/2al3V6f

Friday, July 22, 2016

Wrist or Console Dive Computers

Although most of today’s divers choose the watch-style dive computer, console computers still hold steady in their segment of the market. Here we’ll compare the pros and cons of wrist vs. console dive computers to help you decide which is right for you.

Wrist or Console Dive Computers: The Basics

Essentially, dive computers function in the same way, regardless of where you wear them. A lot of dive-computer models are available as either a wrist or console unit, with the computer itself being identical. The only real difference comes down to how you wear one. A wrist computer is worn like a watch. A console computer sits in a designated unit, typically paired with your manometer and perhaps a compass.

In the early days of scuba, divers would wear separate depth gauges, bottom timers (typically a dive watch with a rotating bezel), manometers and compasses. For ease of use, and to free up some forearm real estate, manufacturers started putting all of these functions into a single console unit. This could be attached to the regulator first stage through a low-pressure hose, allowing the manometer to gauge remaining pressure in the tank. When manufacturers introduced dive computers, they simply replaced the depth gauge and bottom timer in the console with the dive computer, which combines the two.

However, the invention of the dive computer also meant that it was possible to move the depth gauge/bottom timer combo back onto the wrist. Today, both set-ups are readily available. So which is right for you? Both the console and the wrist computers have pros and cons.

Price. Console computers are typically cheaper than their wrist-mounted counterparts, so divers on a budget might want to consider a console.

Info at a glance. On a console, you can stick all of your gauges onto the same unit. This allows you to check your depth, dive time, remaining dive time, heading (if you have a compass), remaining gas in your tank, and possibly more — all at a single glance. Most of this information is also available in a wrist computer. But this usually requires costly extras — wireless gas integration, for example. You may also have to switch between functions, such as toggling between the depth/time info and the digital compass, if the computer has one.

Convenience. Advocates of the console point to the fact that no diver has been known to drop their console mid-dive — they are, after all, tethered to the regulator. The same cannot be said about wrist computers. I’ve personally found three dive computers in my dive career. And the risk of forgetting your dive computer at home or on the boat is almost non-existent with a console.

On the other hand, a console is quite a bit larger and more cumbersome than a simple manometer, which many wrist-computer divers have in its place. Some divers find it annoying to perform an entire safety stop holding onto a large console rather than simply checking their wrist.

Safety. There is no difference in safety when it comes to wrist or console dive computers. They all run on comparable algorithms. Some divers point to the larger console as a potential entanglement risk. But a console that’s properly attached to the BCD and stowed away to ensure a streamlined profile should pose little to no risk.

Which one is right for you?

Console

The Mares Puck 3 comes both in a console version and a wrist version; the console pairing with a compass and a manometer. This streamlined console puts the notion of the clunky console to bed. Aqua Lung’s Inline 2 console is equally streamlined, but half the cost of the Mares.

Wrist

Suunto’s Zoop is a good, basic dive computer at a very reasonable price. Many divers have started out with this computer, or use one as a backup. Still, you’ll usually have to pay 50 percent more for this than for the Aqua Lung console mentioned above. For a more advanced version, the Scubapro Mantis 1 features not only the core scuba-diving functions, but also skin temperature and heart-rate monitoring for more accurate DCI risk evaluation. It’s also streamlined enough that it can double as a wristwatch. Finally, it features a surface-swim mode, allowing you to monitor your swimming strokes.

The post Wrist or Console Dive Computers appeared first on Scuba Diver Life.


from Scuba Diver Life http://ift.tt/2agGhuO